![]() Banners
Banners
 |
Banners are a bit tricky to learn.
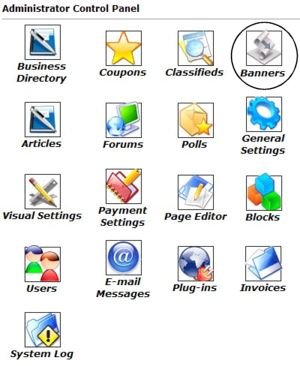
To manage your banner rotator, you will need to login to your Control Panel (this is the same Url as the User Login link on your homepage) using your administration username and password. Click on the icon that is circled in this image (Banners). |
Once you have clicked the icon, you will see a menu similar to the one below.
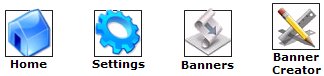
![]() Home
Home
This link brings you back to the Control
Panel Home.
![]() Settings
Settings
This is where you can change the
settings associated with your banner rotators.
| Display banners: | Do not enable this until you have a few banners setup. |
| Timed Rotation: | seconds Setting this to zero will turn off timed rotation. |
| Action for pre-paid banners: | |
| Allow users to edit banners: | |
| Top banner monthly price: | $ |
| Bottom banner monthly price: | $ |
As you can see from the options above, and their drop down bars, you have the ability to set whether or not banners will be displayed on your site. The default is set at 'No, do not display banners on my site'. Note: If you prefer to screen all banners for appropriateness prior to activation, you should set 'Action for pre-paid banners' to 'Hold for administrator approval'. Also note that if you enable the 'Allow users to edit banners' feature, your users will be able to change the banner image and URL after you approve it. This may defeat the purpose of holding the banner for approval. But will save you the headache of updating a listing each time they notice a typo or need a small adjustment.
Timed Rotation: This will
effect how the banners rotate from image to image. Setting this to 0 will cause
a new banner image to be seen each time a new page is loaded. Setting it to any
other number specifies how many seconds should elapse before the next image is
displayed. This means it will change the images automatically. For our example,
a new image will be loaded every 8 seconds if the visitors remains on the same
page.
Note that 'Top Banner' and 'Bottom Banner' refer to the
locations on the page (top of the page, and bottom of the page, respectively) at
which the banners will appear. Bottom Banners are less prominent, and are
generally less valuable than Top Banners.
Our banner rotator software only supports payments in a monthly form. No other payment options are supported. If you wish to ad others, it is up to you. We do not provide help for this.
![]() Click the Update Settings button after setting preferences.
Click the Update Settings button after setting preferences.
![]() Banners
Banners
This is where you can view and manage
all the banners currently being displayed in both your top and bottom banner
rotators.
 |
The Owner is the name of the business
the ad is associated with. In this example the ads were uploaded by the
Admin.
The Loc tells you in which area the banner displays (top of the page, and bottom of the page, respectively). The Url is where a visitor is brought if the ad is clicked. Impressions tells how many times the banner ad has been displayed. |
| Clicks is how many times a visitor has clicked the banner ad, and Expiry is when the banner will be deleted from your site. |
Clicking the Edit ![]() link allows you to access the Banner Details
section to edit any current information, or enable/disable the ad. You can
change the impressions number or the click-through number. You can swap the
current image for a new one, or even extend their ad to display longer, if you
wish. At the bottom
of the Banner Details
is a button to Update your changes.
link allows you to access the Banner Details
section to edit any current information, or enable/disable the ad. You can
change the impressions number or the click-through number. You can swap the
current image for a new one, or even extend their ad to display longer, if you
wish. At the bottom
of the Banner Details
is a button to Update your changes.
Clicking the Delete ![]() link will delete the banner image from your site (this cannot be undone).
link will delete the banner image from your site (this cannot be undone).
 Banner
Creator
Banner
Creator
This is the neatest thing! What if a business registers
and they do not have a banner image to display with their business? Well, for
some of you, you might have lots of graphics design experience and can whip them
up a banner ad easily. But others are not quite this advanced, yet and will need
a little help. This area offers several 'banner blanks'. A banner blank is an
image in the correct image size that is currently waiting for a business' name
and slogan to be added to it. In this area of the Administrator's Control Panel,
clicking this icon will allow you to add new banner blanks, in addition to the
ones offered with the directory software. Your Users can
login to their User Control Panel and use the Banner Creator
to add their Business Name and Slogan to a banner blank of their choice!
Neat-o!
Clicking the Banner Creator icon will show a list of banner blanks currently offered. Below this list of images, you can easily upload new images you have either created on your own, or you have found elsewhere. Our Members Area is a good source for finding banner blank resources online.
 |
To upload an image, you will need to have the image saved on your computer. You will use the Browse button shown to the left to search your computer's hard-drive for the image you wish to upload. Once you have found it, click on the file name to select it. Next click the Upload Banner Image button shown to the left. |
Images larger than 468 x 60 pixels should not be used. Banner images above this amount will be automatically resized down to 60 pixels in height (which could lead to image distortion). Animated images are allowed, but flash banners will not be supported. The file image name should end in .gif, .jpg, .png, or.bmp. Any other files may be invalid and could cause an error message. Also, files sizes should not exceed 60KB. If you see a need for this number to be increased, please contact use via the Support desk and we may be able assist you.
This concluded the tutorial on the Administrator's Banners Module. But we still haven't explained how to add a banner to your rotator. Correct?
 |
Well, businesses can do this for themselves, obviously, thru
the User Control Panel. But as an administrator, you can also add
banners to your rotator easily. You will need to click the Banners
icon, shown circled to the left. Clicking this link shows you, or your
user (who ever is logged in) what banners they currently have displaying
in the rotators.
It displays the Loc, which tells you in which area the banner displays (top of the page, and bottom of the page, respectively). The Url is where a visitor is brought if the ad is clicked. Impressions tells how many times the banner ad has been displayed. |
| Clicks is how many times a visitor has clicked the banner ad, and Expiry is when the banner will be deleted from your site. |
To place a new Top Banner, you would click the 'Click here if you wish to create a top banner'. And to place a new Bottom Banner, you would click the 'Click here if you wish to create a bottom banner'.
 |
After clicking the option to create a new banner (either top or bottom), you will see options like those to the left. The Destination Url needs to be the Url the visitor is brought to when clicking the banner image in the rotator. This will open in a new window, so the visitor remains on your site. You will use the Browse button shown to the left to search your computer's hard-drive for the image you wish to upload for the Banner Image. And last, you select how long you wish the banner to display. |
| Note: Remember, each banner credit is
good for 1 month. Example: You have 15 banners, each of
which is valid for 1 month. If you wish to run a banner for several
months, you can combine banner credits and use the drop down bar to
select 15 months now. Or, you could either create 15 individual banners
for 1 month each!
When finished making your selection, click the Create Banner Button. |
|
Now the banner is being held for activation, unless you selected the option to automatically approve images. If not, you will need to login to the Administrator's Banner management and activate this banner.
The Banner
Creator for your Advertiser's to use:
After clicking the Banner Creator link, in the User's Banner
Area, you can choose a blank banner template but clicking the circle below
the Choose option  to the right of
the banner image. This will be the foundation upon which your new banner will be
built. Once you have selected your image, click the Continue button at the
bottom of this page.
to the right of
the banner image. This will be the foundation upon which your new banner will be
built. Once you have selected your image, click the Continue button at the
bottom of this page.
 |
Enter the name of your company and your slogan (or other
information). Next, choose a font and color for the name and slogan. Next, decide where on the banner you would like the name and slogan to appear. The numbers in the 'Left' and 'Top' fields determine where the top-left corner of the text will appear on the banner. (Increase the 'Left' value to move the text to the right; increase the 'Top' value to move the text down.) To preview your changes, click 'Update Preview'. When you're satisfied with the result, click 'Accept Banner' to download your completed banner. |
| You can see how we toggled the numbers around to create the above pictured image. It is just a few minutes of trial and error, but the end result is fantastic! | |
FAQ's
Q. Why, on my banner creator page , am I only given the option to delete, not create a banner?
A. The Admin Banner Creator allows you to upload banner blanks for your visitors to create banners with. In order for you to create a banner, you also must use the banner icon (like a user would) under the User Control Panel. Then click banner creator. Please read the Chapter on banners. as it contains much information that will help you.Q. Can I give someone credit so they can list a banner free? Or as part of a promotion?
A. Yes. This is not done using the banner manager. It is done under the Users management. If you do not know the username of the client you wish to give a credit to, you will need to use the Business Directory management to navigate to a business that will receive the credit. Click the 'Edit' link, and below the Business Status, you will see the User ID on the account. Clicking the username will bring you to the Users management, where credits can be applied.Q. My banners in my banner rotator are not displaying for me (or perhaps for a visitor). Why?
A. First, check that you have the banners enabled on your site by looking at the General Setting for the Banners in your Admin Control Panel. If it is set to display ads, then you (or the visitor) must have downloaded an ad blocker that tells your browser you do not wish to see ads. This will block all images of certain sizes from being displayed, like a general size banner image (468x60 pixels).
Please visit the Knowledge Base in our Support Center for many other FAQs and their answers.
Close this browser window to return to the Guide. Or click to move on to the next section: Articles
