![]() Business Directory
Business Directory
 |
This is probably the heart and soul section of
your site, as this is where you will be making the majority of your
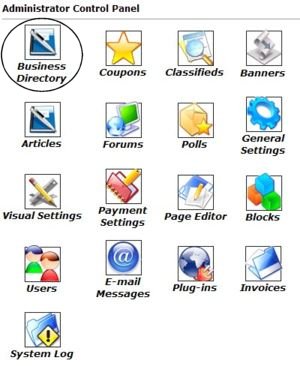
income. In order to access and edit your entire Business Directory module, you will want to login to your Control Panel using your administration username and password. Click on the icon that is circled in this image (Business Directory). This includes creating categories, sub-categories, setting package options, pricing, approving or denying businesses, setting a Business of the Week, editing current businesses, and emailing all businesses who have entered a valid email address. Once you have clicked the icon, you will see a menu similar to the one below...
|
Business Directory Menu

![]() Home
Home
This link brings you back to the Control
Panel home.
![]() Settings
Settings
This is where you will set up your
directory options, packages, prices and add any custom text either above or below the categories listing.
General Settings
| Action for pre-paid business listings: | |
| Allow users to edit listings: | |
| Businesses may be listed in up to: | categories |
| Businesses may submit up to: | image(s) |
| Show street maps to businesses: |
As you can see from the options above, and their drop down bars, you have the ability to set whether or not businesses will be automatically added to your directory, or if you want to review and approve each listing first. Note: If you prefer to screen all business listings for appropriateness prior to activation, you should set 'Action for pre-paid listings' to 'Hold for administrator approval'. Also note that if you enable the 'Allow users to edit listings' feature, your users will be able to completely change the business' details after you approve it. This may defeat the purpose of holding the business for approval. But will save you the headache of updating a listing each time they notice a typo or need a small adjustment.
You can also decide ultimately how
many categories a business can list in and how many images you wish to allow
them to have in their ads. Keep in mind, these settings are Global (meaning it
is the same for all advertisers no matter what package type they choose).
If you wish to not allow a business to upload an image, you can uncheck the
option within the package details as will be explained below. But if you leave
it checked to allow an image(s), then the same number listed above applies to to
any package.
| Allow monthly billing: | |
| Allow quarterly billing: | |
| Allow yearly billing: |
Checking or unchecking these options enables these billing periods. If you wish to only collect payments on a yearly basis, uncheck the other two options and only leave "Allow yearly billing".
Upgrade Prices
| Bold upgrade: | $ | $ | $ |
| Highlight upgrade: | $ | $ | $ |
| "Attention Grabber" upgrade: | $ | $ | $ |
| Price list: | $ | $ | $ |
| Restaurant menu: | $ | $ | $ |
Placing prices in the fields above
specifies the amount you wish each of the following upgrades to cost if they are
not already bundled as part of the pre-existing packages. This would be paid in
addition to the package price they refer to when they list their business.
| :: Price list included: | This will allow businesses to enter certain items or services they offer and their prices. You can learn more about this feature by clicking here. |
| :: Bold upgrade included:
|
This will allow the Company Name to be Bold in the directory listings to help this business stand out from among his fellow advertisers. Note: If you have your Visual Settings, Fonts and Colors set to automatically Bold hyperlinks, then this effect will no longer 'appear' to work, as all links will be bold. |
| :: Highlight upgrade included: | This will allow the Company Name to be a color the Business Owner selects upon registering to help his business stand out from among his fellow advertisers. |
| :: Attention Grabber upgrade included: | This will allow businesses to choose an image |
Package Bundles
Your Business Directory supports various packages. You decide what those packages will include, their costs, and the cost of add-on options not included in a package type. You can see that both Standard and Premium packages are already created for you and allow for both monthly or annual payments. The business directory will automatically list businesses alphabetically. However, Premium Businesses are lifted to the top of their category to be displayed before all Standard listings.
To begin
creating packages and managing existing packages, click the button.
To allow a businesses to list in your directory free, you will need to set the package pricing for "0.00". Then you can have all the add-ons be paid features, if you wish. From this point on it is as easy as completing an online form to set up your packages pricing and features.
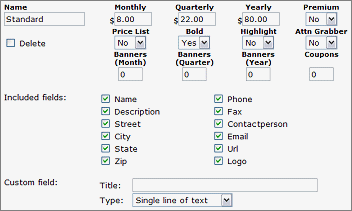
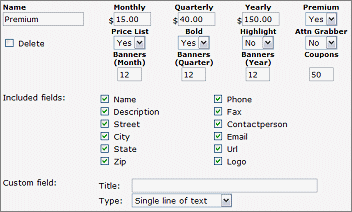
When bundling your packages, please understand that coupons and banners are done on a credits system. If you wish to allow a business to have "1" coupon with a standard business listing package, that means that coupon, once they enter it, is only displayed in the site for one month (no matter what expiration date they apply to the coupon). If you select 4 for the number of allotted coupons, the business can have One coupon display for four consecutive months, or four separate coupons display for one month each (redeemable at anytime during their active business listing account), or any combination (ie: 1 coupon displaying for three months and 1 to only display one month.). This works exactly the same for banners.
Once you have applied all the changes you wish to the current packages, scroll down to the bottom of the packages list and click the button.
To create a new package, click the button. The screen will refresh with the new package at the bottom of the list awaiting a new name and pricing. Click the Update Packages button when finished.
The 'Custom Field' option (at the bottom of the package details) can be for collecting one more bit of information from the business that you might wish your visitors to know. This could be anything from Store Hours to Searchable Keywords. You can only create one custom field per package so plan carefully!
Another way this could be used would be to have it collect a 'promotional code' from the business when registering in case you offered a special discount in an ad. This would tell you they are eligible. You can then apply the special offer to their package and delete the code before enabling the business to the directory. If you left the code in there it would be visible to all users who see this listing in your directory and they would not understand what the code is for.
Content
This section will allow you, the admin, the ability to place a small amount of text either above or directly below the categories table on the Business Directory page. This is optional, if you need additional space to provide instructions, or an announcement.
When you change the text above or below the categories you will see the following:

This is what your editor looks like. You can highlight and
delete the current text displaying there by clicking and holding down your right
mouse button and dragging it over the words Add your content here. And
then clicking the Backspace button on your keyboard. Now you are ready to create
your own text! Each of the buttons along the top tool bar will do something to
effect your page. Hovering your mouse over those options will give you a small
description of the buttons function. Such as the ![]() button will cause your text to be Bold. The
button will cause your text to be Bold. The ![]() will Italicize text, and the
will Italicize text, and the ![]() will underline text. I am not going to go over each and every button
function here, as I am sure your experimenting will show you how much control
and power you will have. Ok, now to create our Contact Page.
will underline text. I am not going to go over each and every button
function here, as I am sure your experimenting will show you how much control
and power you will have. Ok, now to create our Contact Page.
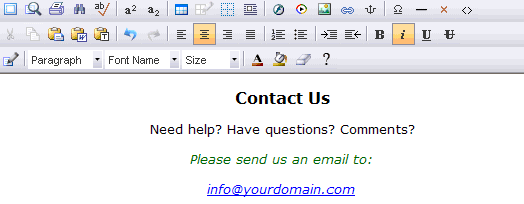
To create the above effects, I used the Justify Center
![]() button to center my text on the page, the font size drop down bar to change the
words Contact Us to a size 4(14pt). Then I used the Bold
button to center my text on the page, the font size drop down bar to change the
words Contact Us to a size 4(14pt). Then I used the Bold ![]() button. Next, I used the enter key to move to start a new paragraph. The typed
the second line of text. Then the enter key again and then the Font
Color
button. Next, I used the enter key to move to start a new paragraph. The typed
the second line of text. Then the enter key again and then the Font
Color ![]() button to change the font to green. Then enter again to move to the next line.
Finally, I typed in an email address for them to contact me at. Upon typing
either an email or an URL, it will automatically create a hyperlink for your
visitors to click.
button to change the font to green. Then enter again to move to the next line.
Finally, I typed in an email address for them to contact me at. Upon typing
either an email or an URL, it will automatically create a hyperlink for your
visitors to click.
*Java Script and html code found on other sites: Any html code copy and pasted from outside sources is considered outside content and will not be supported by our staff. There are simply too many codes and languages out there written by people who may or even may not have known what they were doing. Some of these codes may be poorly written, or may be coded in such a way as to not be supported by our editor. By placing 'code' from other sources in the editor may cause the following:
Improper displaying of content when viewed in the browser
Locking the 'Update Button' after saving so no further changes can be made
Distorting the page and payout of the page the content was added to, causing blocks to display in 'wrong' areas, causing blocks not to display at all.
All of these effects are caused by the code entered into the editor, not of any fault with our software. If this issue occurs, the content will be deleted by our staff. I am sure you understand that it is simply too time consuming for our staff to try to find every instance of poor coding found from other sources on the Internet.
WYSIWYG Icons and what they do:
|
||||||||||||||||||||||||||||||||||||||||||||||||||||||||||||||||||||||||||||||||||||||||||||||||||||||||||||||||||||||||||||||||||||||||||||||||||||||||||||||||||||||||||||||||||||||||||||||||||||||||||||||||||||||||||||||||||||||||||||||||||||||||||||||||||||||||||||||||||||||||||||||||||||||||||||||||||||||||||||||||||||||||||||||||||||||||||||||||||||||||||||||||||||||||||||||||||||||||||||||||||||||||||||||||||||||||||||||||||||||||||||||||||||||
Ready to create your text?? Ok. Just click the Update Text button and away we go!
![]() Businesses
Businesses
Here you can edit any information
pertaining to a current business listed in your directory, or enable/delete a
business awaiting your review. After selecting the above Businesses icon,
you will see a list of all businesses registered. This will display them in
alphabetical order. Clicking on a letter of the alphabet displayed above the
businesses will allow you to view businesses only beginning with that letter.
Please note: Only 15 results per page are posted. You can choose from the pages
numbered below the list of businesses to view more. Here you can see the business name (as it appears in your
directory), any attention grabbers they may be using, the business description,
their contact phone number, their current status (Awaiting Approval or Active),
and finally you are given the ability to Edit the account.
Use the search box below the alphabet to help you quickly locate an ad that may need administering.
Below this list, is the option to send an email to all businesses who have entered a valid email address. To email a business individually, you will need to do it manually.
Clicking the Edit link allows you to access the Business Details section to edit any current information, find out the username who owns the account, upgrade the listing or approve/deactivate the listing. At the bottom of the Business Details is a button to Update your changes, or Delete the Business altogether.
![]() Categories
Categories
Adding categories and subcategories
to your directory is a snap! Or should I say 'click'?
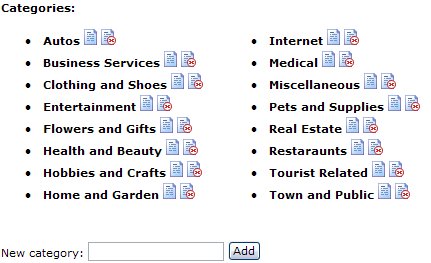 |
To the left, you can see a sample list of categories and
your option associated with them.
And to create a new category, simply type in the name of the new category into the field below the existing categories and click the Add button. |
To create a subcategory for any category, click the Category Name you wish to add to, not the Edit icon.
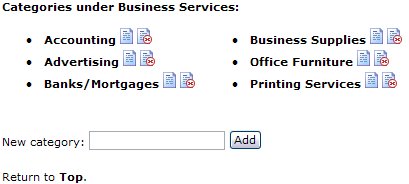 |
And to create a new subcategory, simply type in the name of the new subcategory into the field below the existing categories and click the Add button. |
Clicking Return to Top will return you to the main categories list.
Note: You can create as many categories as you wish. Each
category can have as many subcategories as you wish. And each subcategory can
have as many sub-subcategories as you wish, and so on. You get the idea?
![]() Featured Business
Featured Business
If you wish to feature
any particular business listed in your Business Directory, you can do
this by selecting the Featured Business icon. Doing this is optional,
and you do not have to remove the business after one week, or even
one month if you do not wish. Setting a business of the week will enable the
businesses logo (if one is uploaded) and text Company Name to display in a prominent
area on the Featured Business page right below the categories list. If a
website Url has been added, clicking either the logo or Company Name will cause
the Company's website to open in a new window.
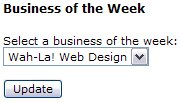
To replace a Featured Business Company for a new one, simply select a different name from the dropdown bar and click the update button. To offer no Featured Business, select None.
When a visitor clicks on the
Featured Business link, show:
The option above allows you the choice of where a visitor would be brought if clicking on the Featured Business. If the business has their own website url in their business directory ad, you can choose to have it link to their personal website. If no url is listed, you can link it to their ad right in your directory.
![]() Attention
Grabbers
Attention
Grabbers
As learned previously, your directory allows businesses
to select from a small image library an attention gaining image to be displayed
with their company name to help them stand out from among fellow advertisers.
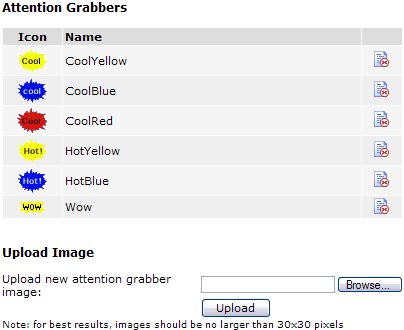 |
Selecting the Attention Grabbers icon will allow you to
remove To upload an image, you will need to have the image saved on your
computer. You will use the Browse button shown to the left to
search your computer's hard-drive for the image you wish to upload. Once
you have found it, click on the file name to select it. Next click the Note: Images larger than 30x30 pixels should not be used. Animated images are allowed. The name of the file image is what the image name will be in the library list, so name your image files accordingly! Upload as many as you wish! |
FAQ's
Q. Will there be a message at the end of a business registration to direct them back home and/or to wait for approval? Will we be able to add or change the message?
A. Yes, there is a message. No you cannot change this message. However, you can customize the message that gets emailed to them.Q. I want to go ahead and approve a business to be displayed in my directory before I have received their check. You know, kind of a show of faith that I believe the check is in the mail. But even though I have enabled it, it is not displaying until I mark the invoice as paid. What can I do about this?
A. Just mark the invoice as paid. The problem is that the account isn't actually setup until the invoice is paid (either for real, or by the administrator clicking 'Mark as paid'). If you're going to give them the benefit of the doubt, though, go ahead and just mark it paid... really, there's no difference from the program's point of view - either way, you're just enabling it.Q. Why can't I add a new business to the directory through my admin user box? If I add it though the regular user box, I show up as the owner. How can I ad a business without becoming the owner?
A. If you haven't yet added the person who owns the business as a valid user, you will have to create an account for them by registering them just like a regular user would. There has to be some accountability for the account, after all. It cannot just 'know' who to assign it to if you haven't registered that person as a user.Q. Can I add text above (or below) the categories?
A. Yes. This is not done using the page editor, though. it is done in the Business Directory, General Settings. Please see the Chapter on the Business Directory in the Guide for more information.Q. The "Bold" upgrade is not working! Why?
A. Check that your Visual Settings are not set for all hyperlinks to be automatically bold. If it is, you will need to uncheck this in order to be able to offer the Bold Upgrade. If you prefer to not uncheck this, then you may wish to change your package options to reflect that "Bold" is included in both Standard and Premium.Q. I have created a new Home page and have moved the Directory to a separate page. Is there a way I can move the Business of the Week back to the new Home page from the Directory page?
A. No. We have found that most Admins would prefer to not use their separate homepages in the manner. However, there is an easy way for you to still 'highlight' the BOW on your homepage. Simply use your browser to go to the current directory page, and 'copy' (highlight the text by holding down the left mouse button, then right mouse clicking and selecting copy) the BOW section. Now, go to your admin panel editor and 'paste' it into the editor where you wish the new BOW section to display. Do not use the 'toggle html' source option, or it will not work. Save your changes and you are done.Q. Is there a way for me to tell how many visitors my sites receives?
A. The CPanel offers this kind of statistics, and visitors relating to hits, etc.
The software will not break it down according to pages, however. Pages in the .html and .htm formats do not exist. Technically only one file is being visited. All pages are 'pulled' from the database.Q. If a person registers their business for the annual plan, and later wishes to upgrade the ad with an add-on like an attention grabber, are they charged the full amount for one year, even though the the may already be 6 months past?
A. No. The charge will be prorated over the amount of time left for that ad campaign.Q. I have noticed that when I click on the advertiser's email link, I have to log in first before I can send an email to the business I want to communicate with. Is this necessary?
A. Yes. Otherwise the software would need to say the email came from the webmaster@yourdirectory.com and then the business would not be able to contact the original sender to reply. Our software needs to know who to say it came from. If we just allow them to fill in the from field, they could easily send spam or harassing emails and say it came from anyone at all. Not very secure, I am sure you will agree.Q. How does a business upgrade from a standard listing to a premium listing without having to reenter his business?
A. They need to login to their account and click the Business Directory icon in the User Control Panel. There will be a list of current businesses they have registered. Then they need to click edit on the business they are upgrading. Now they can edit any information and and add any additions such as upgrading to premium. Clicking save will generate an invoice is any monies are now owed.Q. Is there a way we can make changes to the package details by adding other services like free banner design or free web page?
A. No. Any customizations will need to be made on a separate page like an Advertising Options or Services page that you would create using the page editor.
Please visit the Knowledge Base in our Support Center for many other FAQs and their answers.
Close this browser window to return to the Guide. Or click to move on to the next section: Coupons