Calendar

The Calendar allows visitors or the admin to display events.


You will first need to Install the Plug-in, if you have not already done so.
Next, it is important to know that just installing a plug-in does not make it accessible to your website's visitors. Once it has been installed, you will need to go to the Page Editor and 'set it up'. You will need to make it 'active', tell it where you wish the navigation link to display, and assign it the proper 'plug-in'. How to do this is explained below:

Setting Up Your Plug-in


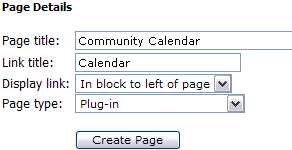
After clicking your Page Editor icon in your Admin Control Panel, you will need to click the text link for a 'New Page'. In this example, we are going to set up the Calendar. In the Page title I have inserted the page name. This title is also what will be displayed in your navigation menus. In the Link title I have entered Calendar. Remember, this is the name file that will be created and must be one word. Next decide where you wish the link to display. And finally, since this is a Plug-in, change the Page type from HTML, to Plug-in. Click the Create Page button to continue.


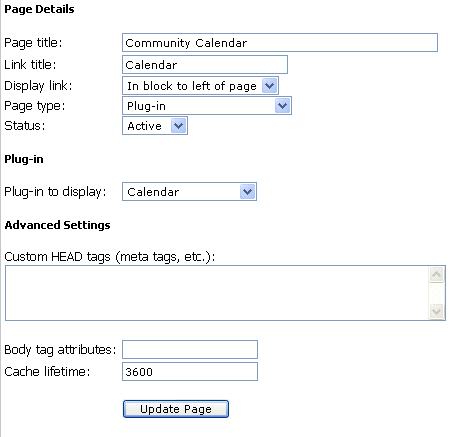
To complete the activation of your new Plug-in, you will need to change the Status from Hidden to Active. Next you will need to change the Plug-in to display from the default 'Business Directory' to the 'Calendar', or whichever Plug-in you are actually installing. 

See left example of changes.

Finally select Update Page.

Your calendar is now active, viewable and can be used by your visitors.


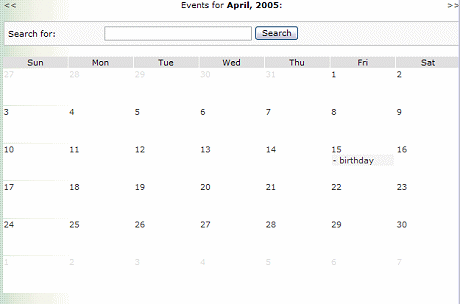
This is how the calendar is displayed on the site. To add information to the calendar, click on a date.

To view event details, click on the event name. 

To search events, type a word or phrase into the search field and click the search button.

To search the previous month or upcoming months, select the << or >> links to either side of the current month title.


This is shown after clicking on date:


 The information put in the short title is what is displayed on the calendar.

When a visitor clicks on the title they view the detailed information the description.

The Date is the choice that was made from the calendar, however if you click on the image they can change the date, month, or year without leaving this page. It will open a calendar.

The last option is Repeat when. How often the event will be repeated.

The choice are:
   Never (one-day event)
   On a daily basis
   On a weekly basis  *see Weekly basis below
   On a monthly basis
   On a yearly basis

If you choose Never (one-day event), you are finished and ready to click Submit.


If you choose weekly, monthly, or yearly you will have a few more choices.

These are related to the Repeat option above. In this image the choice was on a monthly basis.


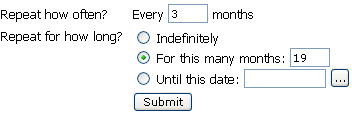
The first option is how how often the event is repeated. This example is set on every 3 months. This ad will run every 3 months (such as January, April, July, October, starting the month you chose to start the event).

The next option is how long do you want the event to run: Indefinitely, For this many months __ (weeks or years if that option was chosen) or Until this date (use to choose a date to stop showing the event)

If you choose *Weekly basis  you will also be able to choose which days of the week to run the event on: Sunday, Monday, Tuesday, Wednesday, Thursday, Friday, Saturday. Choose one or all.

When finished click Submit


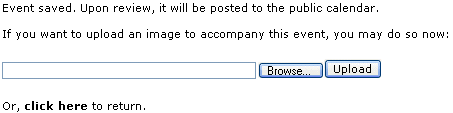
After the event has been Submitted, there is an option to upload an image to accompany the event. This is optional and if chosen, the image will be viewed on the details page and not on the calendar it's self.

To skip this option, use the  " click here to return." at the bottom of the page.

To upload an image click Browse to find the image on your computer. Then click Upload.


Now that the event has been submitted the admin must approve the event before it will show up. The admin will received an email notification that an event has been submitted.
From the Admin Control Panel you will want to choose the Calendar icon.   

If there are events waiting to be approved, you will be able to see a preview of the event and the details such as the description, who submitted the event, the date of the event and how often it will show on the calendar. You will have the choice of [Approve] or [Deny] for each event. Upon approval, the event is visible to all visitors. If there are no events that need to be approved you will simply see Events Pending Approval None.


The event can be deleted by the admin.

To delete the event simply go to the calendar click on the event, while logged in as Admin. There you will see the event's details page with [Delete this event] at the bottom of the page. Click delete and the event is removed. This cannot be undone.


General Settings

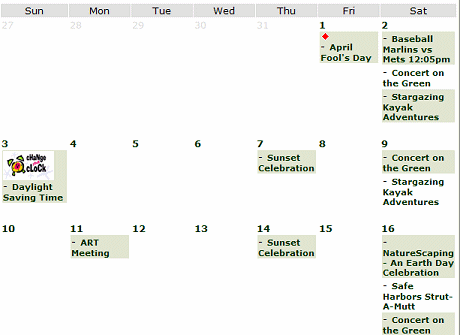
Clicking the General Settings icon in your calendar admin area will allow you to set a color scheme for events to have displayed as an alternating background to help events stand apart from one another. Below you can see an example of how this would work if multiple events are listed on the same day.
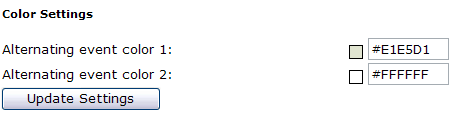

Text Settings

This section will allow you the ability to place a small amount of text below the search bar or directly below the events calendar on the calendar page. This is optional, if you need additional space to provide instructions, or an announcement. 

When you change the text above or below the categories you will see the following:

This is what your editor looks like. You can highlight and delete the current text displaying there by clicking and holding down your right mouse button and dragging it over the words Add your content here. And then clicking the Backspace button on your keyboard. Now you are ready to create your own text! Each of the buttons along the top tool bar will do something to effect your page. Hovering your mouse over those options will give you a small description of the buttons function. Such as the button will cause your text to be Bold. The will Italicize text, and the will underline text. I am not going to go over each and every button function here, as I am sure your experimenting will show you how much control and power you will have. Ok, now to create our Contact Page. 

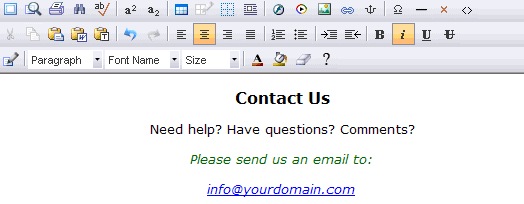
To create the above effects, I used the Center Align button to center my text on the page, the font size drop down bar to change the words Contact Us to a size 4(14pt). Then I used the Bold button. Next, I used the enter key to move to start a new paragraph. The typed the second line of text.  Then the enter key again and then the Font Color button to change the font to green. Then enter again to move to the next line. Finally, I typed in an email address for them to contact me at. Upon typing either an email or an URL, it will automatically create a hyperlink for your visitors to click.

*Java Script and html code found on other sites: Any html code copy and pasted from outside sources is considered outside content and will not be supported by our staff. There are simply too many codes and languages out there written by people who may or even may not have known what they were doing! Some of these codes may be poorly written, or may be coded in such a way as to not be supported by our editor. 

Placing 'code' from other sources in the editor may cause the following: Improper displaying of content when viewed in the browser, locking the Update Button after saving so no further changes can be made, distorting the page and payout of the page the content was added to, causing blocks to display in 'wrong' areas, causing blocks not to display at all. All of these effects are caused by the code entered into the editor, not of any fault with our software. If this issue occurs, the content will be deleted by our staff. I am sure you understand that it would too time consuming for our staff to try to find every instance of poor coding found from other sources on the Internet. 

WYSIWYG Icons and what they do:

 
Fullscreen Mode
  To expand the active window to a full screen click on the 'Fullscreen Mode' Icon. Concurrent clicks on this icon will toggle this feature on and off.
Cut (Ctrl+X)
  To cut a portion of the document, highlight the desired portion and click the 'Cut' icon (keyboard shortcut - CTRL+X).
Copy (Ctrl+C)
  To copy a portion of the document, highlight the desired portion and click the 'Copy' icon (keyboard shortcut - CTRL+C).
Paste (Ctrl+V)
  To paste a portion that has already been cut (or copied), click where you want to place the desired portion on the page and click the 'Paste' icon (keyboard shortcut - CTRL+V).

To paste from Microsoft Word, click on the drop down icon next to the Paste Icon.
Paste from Microsoft Word (Ctrl + D)
  To Paste from Microsoft Word: Copy your desired text from Microsoft Word and click the drop down icon next to the paste icon. Select the 'Paste from MS Word Option'. This will remove the tags that Microsoft Word automatically places around your text. It will also remove most text formatting as well.
Paste Text
    To Paste Text
Search, Find and Replace
  To find and replace words or phrases within the text:
Select the search and replace feature. Enter the word or phrase you wish to replace and type it in the 'Find what' field

Select the new word or phrase you wish to replace the searched text with in the 'Replace with' field.

You can choose to 'find next' which allows you to manually replace instances of the searched text, or you can choose 'replace all' which allows you to replace all instances of the selected text.

Selecting the optional 'Match Case' tab allows you to search for a word or phrase with exactly the same upper or lower-case spelling of the word or phrase entered in 'Find What'. Not selecting this option means that a word entered in the 'Find what' field with upper case characters will return a search of upper and lower case matches of the same word.

Selecting the optional 'Match whole word only' tab allows the search to only display the words that are an exact match of the word or phrase entered in the 'Find What' field.
Undo (Ctrl+Z)
  To undo the last change, click the 'Undo' icon (keyboard shortcut - CTRL+Z). Each consecutive click will undo the previous change to the document.
Redo (Ctrl+Y)
  To redo the last change, click the 'Redo' icon (keyboard shortcut - CTRL+Y). Each consecutive click will repeat the last change to the document.
Check Spelling (F7)
  To check spelling, select the text you would like to spell check (if you do not select the text, then your whole document will be checked)

Click on the spell checker icon or right click on the mouse and scroll down to 'Check spelling'.

You will be taken to the first incorrectly spelled word. You can then choose to

- Change the incorrectly spelled word with the suggested words provided
- Ignore the incorrectly spelled word (i.e. not make any changes to it)

To check spelling of a single word, highlight the word and right click on the mouse to get a selection of suggested replacements. To replace the miss-spelt word with one of the suggested words, simple select one of the replacements.
Remove Text Formatting
  This command allows you to select a specific portion of text and remove any of the formatting which it contains. To remove any text formatting select the desired portion of text and Click the 'Remove Text Formatting' button.
Bold (Ctrl+B)
  To bold text, select the desired portion of text and click the 'Bold' icon (keyboard shortcut - CTRL+B). Each consecutive click will toggle this function on and off.
Underline (Ctrl+U)
  To underline text, select the desired portion of text and click the 'Underline' icon (keyboard shortcut - CTRL+U). Each consecutive click will toggle this function on and off.
Italic (Ctrl+I)
  To convert text to italic, select the desired portion of text and click the 'Italic' icon (keyboard shortcut - CTRL+I). Each consecutive click will toggle this function on and off.
Strikethrough
  To format text as strike through Select the text you want formatted by highlighting it and select the 'Strike through' icon. Each consecutive click will toggle this feature on and off
Insert Number List
  To start a numbered text list, click the 'Insert Numbered List' icon. If text has already been selected, the selection will be converted to a numbered list. Each consecutive click will toggle this function on and off.
Insert Bullet List
  To start a bullet text list, click the 'Insert Bullet List' icon. If text has already been selected, the selection will be converted to a bullet list. Each consecutive click will toggle this function on and off.
Decrease Indent
  To decrease indent of a paragraph, click the 'Decrease Indent' icon. Each consecutive click will move text further to the left.
Increase Indent
  To increase indent of a paragraph, click the 'Increase Indent' icon. Each consecutive click will move text further to the right.
Superscript
  To convert text to superscript (vertically aligned higher): Select the desired portion of text and click the 'Superscript' icon. Each consecutive click will toggle this function on and off.
Subscript
  To convert text to subscript (vertically aligned lower): Select the desired portion of text and click the 'Subscript' icon. Each consecutive click will toggle this function on and off.
Align Left
  To align to the left, make a selection in the document and click the 'Align Left' icon.
Align Center
  To align to the center, make a selection in the document and click the 'Align Center' icon.
Align Right
  To align to the right, make a selection in the document and click the 'Align Right' icon.
Justify
  To justify a paragraph or text, make a selection in the document and click the 'Justify' icon.
Insert Horizontal Line
  To insert a horizontal line, select the location to insert the line and click the 'Insert Horizontal Line' icon.
Create or Modify Link
  To create a hyperlink, select the text or image to create the link on, then click the 'Create or Modify Link' icon. if applicable, the popup window will contain existing link information. You can type the full URL of the page you want to link to in the URL text box. You can also enter the target window information (optional) and an anchor name (if linking to an anchor - optional).

For quick access to links, you can choose to insert a pre-defined link from the 'Pre-defined links' dropdown list.

When finished, click the 'Insert Link' button to insert the hyperLink you just created, or click 'Remove Link' to remove an existing link. Clicking 'Cancel' will close the window and take you back to the editor.
Insert / Modify Anchor
  To insert an anchor, select a desired spot on the web page you are editing and click the 'Insert / Modify Anchor' icon. In the dialogue box, type the name for the anchor.

When finished, click the 'OK' button to insert the anchor, or 'Cancel' to close the box.

To modify an anchor select the anchor (displayed as an anchor icon when guidelines are switched on) and click the 'Insert / Modify Anchor' icon. Make your changes and hit the 'OK' button or click 'Cancel' to close the window.
Font
  To change the font of text, select the desired portion of text and click the 'Font' drop-down menu.

Select the desired font (choose from Default - Times New Roman, Arial, Verdana, Tahoma, Courier New or Georgia).
Font Size
  To change the size of text, select the desired portion of text and click the 'Size' drop-down menu.

Select the desired size (text size 1-7).
Paragraph
  To change the format of text, select the desired portion of text and click the 'Format' drop-down menu.

Select the desired format (choose from Normal, Superscript, Subscript and H1-H6).
Styles & Formatting
  To change the style of text, images, form objects, tables, table cells etc select the desired element and click the 'Style' drop-down menu, which will display all styles defined in the style-sheet.

Select the desired style from the menu.

Note: this function will not work if there is no style-sheet applied to the page.
Font Color
  To change the color of text, select the desired portion of text and click the 'Color' drop-down menu.

Select the desired color from the large selection in the drop-down menu. To define your own custom color, click on the 'More Colors...' button at the bottom of the color picker.

This will launch the advanced color picker, where you can select a color from the color map, or specify your own color using RGB or hex values. You can also change the contrast of the color by clicking on the contrast gradient
Background Color
  To change the highlighted color of text, select the desired portion of text and click the 'Highlight' drop-down menu.

Select the desired color from the large selection in the drop-down menu. To define your own custom color, click on the 'More Colors...' button at the bottom of the color picker.

This will launch the advanced color picker, where you can select a color from the color map, or specify your own color using RGB or hex values. You can also change the contrast of the color by clicking on the contrast gradient
Insert Table
  To insert a table, select the desired location, then click the 'Insert Table' icon.

A new window will pop-up with the following fields: Rows - number of rows in table; Columns - number of columns in table; Width - width of table; BgColor - background color of table; Cell Padding - padding around cells; Cell Spacing - spacing between cells and Border - border around cells.

Fill in table details then click the 'OK' button to insert table, or click 'Cancel' to go back to the editor.
Edit Table Properties
  To modify table properties, select a table or click anywhere inside the table to modify, then click the 'Modify Table Properties' icon.

A pop-up window will appear with the table's properties. Click the 'OK' button to save your changes, or click 'Cancel' to go back to the editor.

Note: this function will not work if a table has not been selected.
Show / Hide Guidelines
  To show or hide guidelines, click the 'Show/Hide Guidelines' icon.

This will toggle between displaying table and form guidelines and not showing any guidelines at all.

Tables and cells will have a broken gray line around them, forms will have a broken red line around them, while hidden fields will be a pink square when showing guidelines.

Note that the status bar (at the bottom of the window) will reflect the guidelines mode currently in use.
Insert Row
  To insert row above, click inside cell above which to insert a row, then click the 'Insert Row Above' icon.

Each consecutive click will insert another row above the selected cell.

Note: this function will not work if a cell has not been selected.
Delete Row
  To delete a row, click inside cell which is in the row to be deleted, then click the 'Delete Row' icon.

Note: this function will not work if a cell has not been selected.
Delete Column
  To delete a column, click inside cell which is in the column to be deleted, then click the 'Delete Column' icon.

Note: this function will not work if a cell has not been selected.
Insert Column
  To insert a column, click inside cell which is in the column to be inserted, then click the 'Insert Column' icon.

Note: this function will not work if a cell has not been selected.
Increase / Decrease Column Span
  To increase / decrease column span, click inside cell who's span is to be decreased, select the Edit Tables / Cells icon and choose Edit Table from the dropdown menu.  then click the 'Decrease Column Span' icon.

Each consecutive click will further decrease the column span of the selected cell. Note: this function will not work if a cell has not been selected.
Insert / Modify Flash
  If a flash movie is NOT selected, clicking this icon will open the Flash Manager.

If a flash movie IS selected, then clicking this icon will open the 'Modify Flash Properties' popup window.

To modify the properties of the selected flash movie, set the required attributes and click the 'Modify' button.
Insert / Modify Media
  If an image is NOT selected, clicking this icon will open the Image Manager.

If an image IS selected, then clicking this icon will open the 'Modify Image Properties' popup window.

To modify the image properties of the selected image, set the required attributes and click the 'Modify' button.
Insert / Modify Image
  If an image is NOT selected, clicking this icon will open the Image Manager.

If an image IS selected, then clicking this icon will open the 'Modify Image Properties' popup window.

To modify the image properties of the selected image, set the required attributes and click the 'Modify' button.
Insert Special Characters
  To insert a special character, click the 'Insert Special Character' icon.

A pop-up window will appear with a list of special characters.

Click the icon of the character to insert into your web page.
Toggle Absolute Positioning
  To position a text box or image using absolute positioning, select the the textbox or image and select the 'absolute positioning' icon. You can now click and drag an image or text box to the location you would like it to reside within the active window.
Source Mode
  To switch to source code editing mode, click the 'Source' button at the bottom of the editor.

This will switch to HTML code editing mode.

To switch back to WYSIWYG Editing, click the 'Edit' button at the bottom of the editor.

This is recommended for advanced users only
Preview Mode
  To show a preview of the page being edited, click the 'Preview' button at the bottom of the editor.

This is useful in previewing a file to see how it will look exactly in your browser, before changes are saved.

To switch back to editing mode, click the 'Edit' button at the bottom of the editor.

Ready to create your text?? Ok. Just click the Update Text button and away we go! 


Upcoming Events Block
Your Calendar comes with a block that automatically gets installed as part of the plugin. This block self updates and displays the upcoming events within 30 days of the current date in a scrolling marquee. Each night it will remove events from the previous day and add new events for the dates within the next month. This functionality cannot be altered in any way. The block code is protected to keep its functionality in an operating order. The wording and block title also cannot be changed. You can access this block and apply it to any pages you want using the Page Editor. You can learn more about applying the block (Titled: Upcoming Events) in the Page Editor Chapter of this Guide. 

Note: The block cannot be created until at least one new event has been added and approved into the calendar (otherwise there would be nothing to display inside the block). The block will be created automatically and will display in your blocks list. You need to apply it to pages yourself, however. This is not automated for you.


Please visit the Knowledge Base in our Support Center for many FAQs and their answers.


Close this browser window to return to the Guide. Or click to move on to the next section: CNN News